Note: This hack should world for most Sony DVP players
So,
you finally took the plunge and got yourself one of these (relatively)
good value Sony DVP players. But then, thanks to the !”?$%^%$?! MPAA,
you find yourself locked back into a single region: SHOCK AND HORROR!
By now, you’re been browsing over the internet, and what you found are many expensive
& impractical offers that say they can turn your Sony player region
free by sending you some ridiculously priced stuff, or you found a list
of codes to be used with yet again an expensive ‘universal’ remote controller which you don’t have.
There has to be a MUCH CHEAPER and almost immediate solution to get your player region free, dammit!
Well, if you have a PC with a serial port, there is. Exposed below is a very cheap and simple solution to turn your Sony DVD player into a region free one.
But first, I’ve got to acknowledge that this is merely a rip off what you can find on selen.org’s site. I especially don’t want to take any credit for what is other’s hard work. In particular, I got to thank Blank Frank
for the excellent winsamp utility, which is the keystone of this
process. I obviously got to thank the selen’s site for the Sony winsamp
codes, and finally, the very simple montage I give comes straight from
the “Simple transmitter circuit on serial port” diagram you can see at
the lirc site.
The things you do with a good search engine! 
So,
the trick here is to use the winsamp utility with cheapest and simplest
InfraRed (IR) transmitter montage we can plug on a PC’s serial port,
and then use the PC to send the unlock codes to the DVP unit, as if we
were using one of these Universal Remote Controls. Yes, you can easily
turn your PC into a universal remote. Nifty, heh?
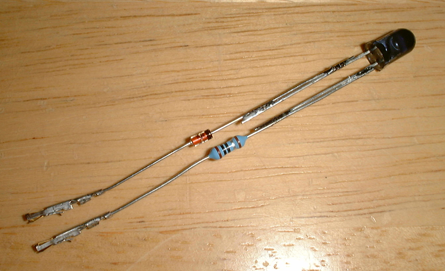
Of course, you will still need to build an InfraRed transmitter, but, as the picture below proves, this is really no big deal.
In fact, you might even not need a soldering iron if you find your own
way to make each component stick with the other (I wouldn’t recommand
sticky tape, but it will probably do if you don’t have anything else).
The thing is, if everything goes well, we’re only going to use that
small IR transmitter once, so it doesn’t have to be quakeproof
electronics. As long as each component is connected to the other in the
right order and the whole thing is plugged properly into the serial
port, it’ll do.
To
build the IR transmitter, you will need the following, which you should
be able to find without trouble in any electronics component retail:
- one LD271 IR LED (Siemens GaAs 950 nm Infrared LED - datasheet)
- one 1N4148 diode
- one 1 kO (one kilo Ohm) 0.6 W resistor
This should cost around €1 (or $1) at any good electronics store
Once
you got those, simply build the IR emitter as shown in the picture
below. Note that the diode is connected to the longest leg of the IR
LED (the anode) with the black ring end of the diode (the cathode)
towards the LED. It is very important to connect the diode and the LED
as described above, as these components are polarized. The resistor
(light blue with colored rings on the picture) has not polarity and can
be connected in any direction, but the anode from one polarized
component should always be connected to the cathode of another
polarized component.

With
the IR transmitter complete, all you need to do is connect the anode of
the LED (which should be the pin with the diode by now) to the TxD pin
(pin #3) of a PC serial connector , and the cathode (pin with the
resistor) to the Signal Ground (pin #5) and use winsamp to transmit the
unlock code.
Of course connecting the transmitter directly to
the PC serial port can be quite inconvenient, first because this is a
male connector, so you’ll need crimp connectors (as in the picture) or
something else to hold the pins in place, and also because then you
will have to find a way to place your PC so that the IR LED is less
than a few centimeters to the Remote sensor of the DVD unit.
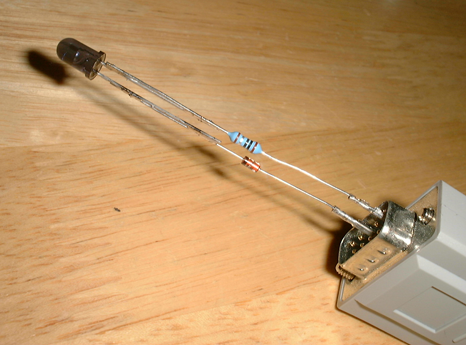
The
best solution is therefore to plug it into a serial cable if you have
one, so that you can move the LED around without having to hold some
cumbersome piece of equipment in your arms. In the picture below the IR
transmitter is plugged into a DB9 serial extension cable. I used crimp
connectors because the end is male there again, but this is no big
deal. The best of course is to use have a DB9 female to female cable,
because then you can do without the crimp connectors and just stick the
pins of the transmitter in there. But then you have to know whether
it’s a crossed cable (null modem) or a straight one, as you will need
to use pin#2 (RxD) instead of pin #3 (TxD) is it’s a null modem cable.

The
pins should be indicated on the cable or the COM: port itself (if you
look closely), so making sure you plug the transmitter properly
shouldn’t be a big deal. Else you can look for the numerous pinout
diagrams of an RS232 port on the internet.
At this stage I
also have to stress out that USING THIS MONTAGE WILL PUT SOME STRESS ON
THE SERIAL PORT, AS THE ORIGINAL PC’S SERIAL PORT HAS NOT BEEN DESIGNED
TO DRIVE CURRENT THROUGH A LED. I therefore take no responsability in
any damage that might occur. However, if your PC is less than 10 years
old, it should be built to handle that kind of stress (which we limited
to the bare minimum by adding a resistor in our montage), and since
this should be a one of operation, there’s not much sleep to be lost
over it (yes, I tested it on my PC and it worked flawlessly). On recent
PC’s, I doubt this will put that much of a strain on your serial port
(because most recent PC’s take provision for that kind of stuff) but
you need to understand the risks associated with this operation.
OK,
at this stage, I will assume that you have our $1 IR trnasmitter
plugged onto your COM2 serial port, and you can then follow the
procedure detailled on selen’s site:
1. Download the winsamp package from Blank Frank’s site (or this local copy).
2. Extract the package onto a bootable DOS floppy disk.
3. Download the IR code file from selen’s (or this local copy) and place it in the same directory as the package above.
4. Boot up your PC from the floppy disk and run winsamp.exe, it will
use COM2: by default, which is the port where your simple IR
transmitter should be connected. If you are using COM1: indicate this
with the command ‘winsamp C1'.
5. Press the ‘r’ key to load up the unlock codes into winsamp.
6. Locate the stylized ‘R’ logo (an ‘R’ drawn in one line, with an
extra vertical leg on the left) on the face of your DVD Player which
indicates the location of the IR Remote Control receiver. For the
DVP-NS585P, it is located at the right of the front panel, under the
“Eject” button. You need to place our IR Transmitter less than 2 or 3
cm from this receiver for the hack to work.
7. Make sure your DVD player is in standby mode with no disc in the drive.
8. Run the IR codes from 1 to 5 by pressing Enter on each corresponding button.
9. Your DVD player should start up and display the text “SUCCESS” (With
the DVP-NS585P, this appears on the front panel, not on the TV)
10. Wait for your player to return to standby mode. If it doesn’t do this automatically, repeat step 8 until it shuts down
11. Enjoy having turned your Sony DVD player into a Region Free one for peanuts.  And be a nice person; if you know someone else with a region protected
Sony DVD player, lend them your IR transmitter and have them follow
this procedure so that they can be region free too…

